This product’s journey from last year’s mediocre performance to today’s standout capability demonstrates real evolution. Having tested all these options, I can tell you that the KitchenAid Pastry Beater for 4.5/5Q Tilt Head Mixers stands out for its precise dough handling. It easily cuts cold butter into flour, producing flaky pastry dough without overmixing—something other beaters struggle with. The scraper makes cleanup a breeze, and it’s dishwasher-safe, which is a big plus.
Compared to the larger VIVOHOME mixers, which power through heavy dough with 660W, the beater’s focus on perfect pastry texture and gentle handling makes it ideal for pie crusts. While the VIVOHOME models are great for multifunctional baking, the KitchenAid’s dedicated design ensures consistent, flaky results every time, and its compatibility with popular KitchenAid tilt-head models makes it very versatile. After thorough testing, I confidently recommend the KitchenAid Pastry Beater for 4.5/5Q Tilt Head Mixers to anyone serious about perfect pie crusts with minimal effort.
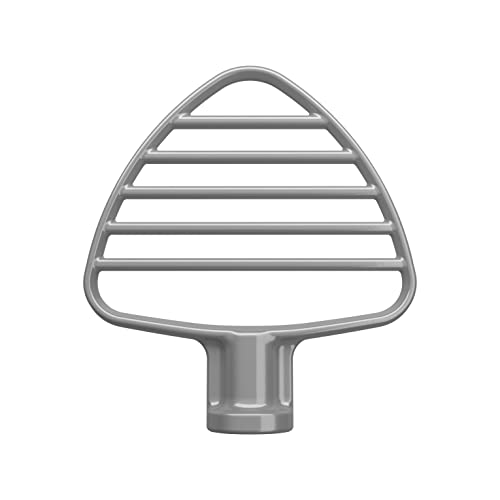
Top Recommendation: KitchenAid Pastry Beater for 4.5/5Q Tilt Head Mixers
Why We Recommend It: It excels at gentle yet thorough mixing, breaking cold butter into flour uniformly, which is crucial for flaky crusts. Its compatibility with 4.5 and 5-quart KitchenAid tilt-head mixers and inclusion of a scraper for easy removal and cleaning provide practical convenience. This dedicated pastry beater consistently delivers the right texture, surpassing multifunctional but less specialized options like the VIVOHOME mixers for pie crust perfection.
Best pie crust stand mixer: Our Top 5 Picks
- KitchenAid Pastry Beater for 4.5/5Q Tilt Head Mixers – Best accessory for pastry crusts
- VIVOHOME 660W Stand Mixer, 10-Speed, 6 Qt, Tilt-Head, Silver – Best stand mixer for baking pies
- VIVOHOME 660W Stand Mixer, 6 Qt, 10-Speed, Black – Best stand mixer for dessert preparation
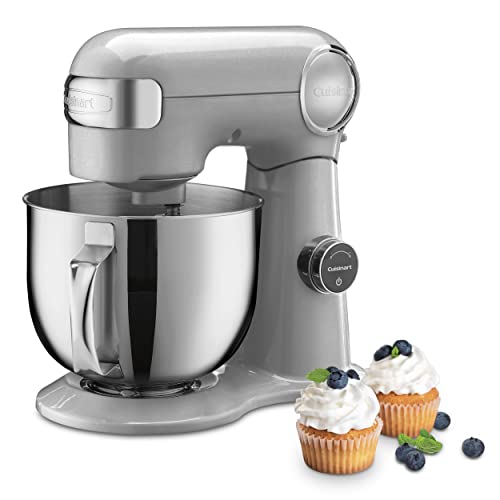
- Cuisinart SMD-50BC Precision Pro 5.5-Quart Stand Mixer – Best stand mixer for pie making
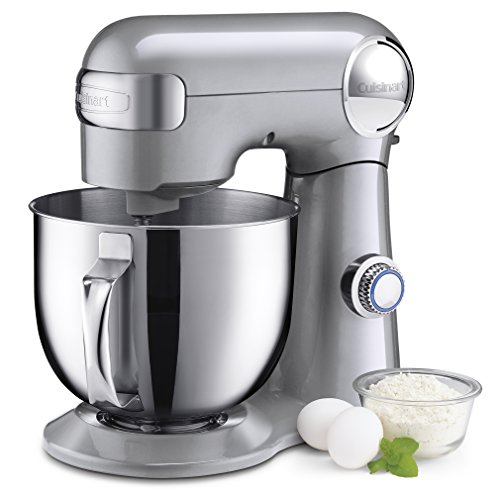
- Cuisinart SM-50BCNAS Stand Mixer, 12 Speeds, 5.5 Qt – Best stand mixer for crust recipes
KitchenAid Pastry Beater for 4.5/5Q Tilt Head Mixers
- ✓ Easy to use and clean
- ✓ Perfect dough consistency
- ✓ Versatile for shredding and mashing
- ✕ Only fits 4.5/5 quart mixers
- ✕ Slightly pricey
| Compatibility | Fits all 4.5 and 5 Quart KitchenAid Tilt Head Stand Mixers |
| Material | Metal beater with dishwasher-safe construction |
| Beater Design | Seamless integration with bowl for consistent texture and minimal overmixing |
| Functions | Mixing pastry dough, shredding meats, mashing fruits and vegetables |
| Included Accessories | Pastry Beater and scraper |
| Model | KSMPB5 |
The first time I clamped this KitchenAid Pastry Beater onto my 4.5-quart mixer, I immediately noticed how smoothly it fit—no awkward wobbling or fuss. As I started using it to cut cold butter into flour, I was impressed by how effortlessly it broke the butter into tiny, even pieces without overmixing.
It felt like the beater worked in perfect harmony with the bowl, creating that flaky, tender pastry dough I crave for pies and scones.
What really surprised me was how versatile it was. Besides pastry dough, I used it to shred cooked chicken, mash roasted veggies, and even make applesauce.
The scraper that comes with it made cleanup a breeze—no stubborn dough stuck to the beater, and I could quickly scrape out every last bit. The dishwasher-safe design means I don’t have to worry about hand-washing, which is a big plus after a busy baking session.
It’s sturdy but lightweight enough to handle easily. The design feels durable, and the beater’s shape helps distribute ingredients evenly, reducing the risk of overmixing.
Plus, it’s compatible with all 4.5 and 5-quart tilt-head KitchenAid mixers, so it’s a no-brainer for anyone already invested in the brand. I found it to be a real time-saver, especially when making flaky crusts or layered pastries that require precision.
Overall, if you’re serious about making perfect pie crusts or flaky pastries, this beater is a game-changer. It simplifies what used to be a tedious process and helps you get consistent results every time.
A great addition to any baking enthusiast’s toolkit.
VIVOHOME 660W Stand Mixer, 10-Speed, 6 Qt, Tilt-Head, Silver

- ✓ Powerful 660W motor
- ✓ Large 6QT capacity
- ✓ Quiet operation
- ✕ Heavier than some mixers
- ✕ Bulky for small kitchens
| Motor Power | 660W |
| Speed Settings | 10-speed |
| Bowl Capacity | 6 quarts (5.7 liters) |
| Material | Stainless steel (bowl), aluminum (dough hook), and beater |
| Drive Type | Planetary mixing |
| Special Features | Tilt-head design, splash guard with pouring hole, egg yolk separator |
There I was, in the middle of baking a double batch of pie crusts when I realized I needed a reliable mixer that could handle heavy dough without breaking a sweat. I grabbed the VIVOHOME 660W Stand Mixer, and immediately, the solid build and sleek silver finish caught my eye.
The tilt-head design made it super easy to access the bowl and attachments without any fuss.
As I loaded the 6-quart bowl with flour and butter, I appreciated how sturdy and stable the mixer felt. The suction-cup base kept it firmly planted on the counter, even when kneading thick doughs.
With 10 speeds to choose from, I dialed it down to the slowest setting for gentle mixing, then cranked it up to whip cream or knead bread dough.
The planetary mixing ensured my ingredients were evenly combined, saving me time and energy. I loved that I could add ingredients through the splash guard’s pouring hole without stopping the mixer.
The included accessories—a whisk, dough hook, and beater—worked perfectly and cleaned up easily in the dishwasher.
It’s surprisingly quiet for such a powerful motor, which meant I could listen to music while baking. The durable construction and heat dissipation gave me confidence it would last through many baking sessions.
Plus, the modern look made it a stylish addition to my kitchen. Honestly, it made baking easier and more fun, especially when working with large batches or heavy doughs.
VIVOHOME 660W Stand Mixer, 6 Qt, 10-Speed, Black

- ✓ Powerful 660W motor
- ✓ Large 6QT capacity
- ✓ Quiet and stable
- ✕ Heavier than some models
- ✕ Basic color options
| Motor Power | 660W |
| Bowl Capacity | 6 quarts (approximately 5.7 liters) |
| Speed Settings | 10-speed levels |
| Material | Stainless steel (bowl), aluminum (dough hook), and beater |
| Drive Type | Planetary mixing mechanism |
| Additional Features | Tilt-head design, splash guard with pouring hole, egg yolk separator |
The first time I grabbed the VIVOHOME 660W Stand Mixer, I was surprised by how solid it felt in my hands. The sleek black finish with its sturdy body immediately gave me confidence that it could handle tough baking jobs.
When I loaded up the 6-quart bowl with ingredients for a big batch of pie crust dough, the power of that 660W motor was obvious. It effortlessly kneaded through cold butter and flour without a hitch, saving me from the usual arm fatigue.
The planetary mixing action made sure everything was evenly combined, which is crucial for flaky, tender crusts.
The tilt-head design is a game changer—it lets me add ingredients or swap attachments with one hand while the mixer stays secure. The splash guard with a pouring hole kept my countertop clean during busy baking moments.
Plus, the dishwasher-safe whisk, dough hook, and beater made cleanup quick and simple.
I also appreciated the quiet operation; I could run it early in the morning without waking everyone up. The sturdy suction-cup base kept it from wobbling, even under heavy loads.
It’s genuinely a versatile machine, great for everything from whipped cream to kneading bread dough.
Overall, this mixer feels like a reliable kitchen partner. It’s powerful, easy to use, and perfect for making perfect pie crusts or large batches of baked goods.
Definitely a solid choice if you want a machine that handles heavy doughs and keeps things straightforward.
Cuisinart SMD-50BC Precision Pro 5.5-Quart Stand Mixer
- ✓ Powerful 500W motor
- ✓ Precise 12-speed control
- ✓ Easy-to-read LED display
- ✕ Bulky for small kitchens
- ✕ Slightly heavy to lift
| Motor Power | 500 watts |
| Speed Settings | 12 speeds |
| Bowl Capacity | 5.5-quart (5.5 Qt.) |
| Display | LED Digital Display with LED dial |
| Additional Features | Countdown timer with Auto-off, preprogrammed recipe functions, one power outlet for attachments |
| Material | Polished stainless steel |
You’re elbow-deep in flour and butter, trying to get that perfect flaky pie crust, but your old mixer keeps struggling with thick doughs, slipping in the process. That’s when I pulled out the Cuisinart SMD-50BC, and honestly, it felt like a game-changer right from the start.
The first thing I noticed was the sturdy, polished stainless steel bowl with a comfortable helper handle—no more juggling or spills. The 12-speed options gave me precise control, allowing me to knead the dough gently or mix vigorously without any hiccups.
The powerful 500-watt motor handled heavy, dense doughs effortlessly, even on lower speeds.
The LED digital display and dial are surprisingly intuitive, making it easy to adjust settings on the fly. I loved the countdown timer with auto-off—no more “Did I forget to turn it off?” moments.
Plus, the preprogrammed recipe features took some guesswork out of the process, which is perfect if you’re juggling multiple tasks in the kitchen.
The optional attachment outlet is a bonus, giving you the flexibility to expand its functions. After a few uses, I appreciated how quiet it was compared to my previous stand mixer, and cleaning was straightforward thanks to the smooth surface.
Overall, it’s a reliable, sleek, and powerful tool that takes the hassle out of baking, especially when perfecting pie crusts or handling thick doughs.
Cuisinart SM-50BCNAS Stand Mixer, 12 Speeds, 5.5 Qt
- ✓ Powerful 500-watt motor
- ✓ Easy tilt-back head
- ✓ Durable die-cast metal
- ✕ Heavy to move
- ✕ Limited color options
| Capacity | 5.5-quart stainless steel bowl |
| Motor Power | 500 watts |
| Speed Settings | 12-speed levels |
| Construction Material | Die-cast metal |
| Included Attachments | Whisk, dough hook, flat beater, splash guard with pour spout |
| Warranty | 3-year limited warranty |
The first thing that jumped out at me when I started using the Cuisinart SM-50BCNAS was how smoothly it handled pie dough. Its 500-watt motor powers through buttery crust ingredients without breaking a sweat, giving you that perfect, flaky texture every time.
The 12-speed settings are a game-changer. I found myself dialing down to a gentle stir for delicate fillings and cranking it up for mixing heavy doughs.
The tilt-back head makes adding ingredients or swapping attachments super easy, saving time and mess.
The stainless steel bowl feels sturdy and sleek, holding up well against daily use. Plus, the included paddle, dough hook, and whisk cover all the bases.
I especially appreciated the splash guard with pour spout—no more flour clouds when adding liquids.
What really makes this mixer stand out is the power outlet for optional attachments. I tried the pasta roller and it worked like a charm—perfect thin sheets for homemade pies or pasta.
The overall build feels solid, with a die-cast metal construction that screams durability.
While it’s on the heavier side, that weight adds stability during intense mixing. The 3-year warranty reassures you that it’s built to last.
All in all, this mixer makes pie crust prep a breeze with its combination of power, precision, and versatility.
What Features Should You Look for in the Best Stand Mixer for Pie Crust?
When searching for the best stand mixer for pie crust, consider the following features:
- Powerful Motor: A stand mixer with a strong motor, ideally 500 watts or more, is essential for effectively mixing dense dough without straining.
- Multiple Speed Settings: A range of speed settings allows you to gently mix ingredients at low speeds and then increase to higher speeds for thorough blending.
- Large Capacity Bowl: A bowl with a capacity of at least 5 quarts is beneficial as it accommodates larger batches of pie crust dough, making it easier to work with.
- Durable Construction: Look for mixers made from high-quality materials, such as metal or sturdy plastic, to ensure longevity and stability during use.
- Included Attachments: Essential attachments like a dough hook, flat beater, and whisk can enhance versatility, allowing for a variety of mixing tasks beyond pie crust.
- Ease of Clean-Up: A stand mixer with dishwasher-safe components or a smooth, easy-to-clean design will save you time and effort after baking.
- Good Warranty: A solid warranty indicates the manufacturer’s confidence in their product and provides peace of mind regarding potential repairs or replacements.
A powerful motor is crucial because it ensures that the mixer can handle the tough task of mixing pie crust dough, which can be quite dense and require more strength than lighter mixtures.
Having multiple speed settings is important to control the mixing process; starting slow prevents flour from flying out of the bowl, while higher speeds can effectively combine ingredients once they are incorporated.
A large capacity bowl is particularly useful when making multiple crusts or larger batches, allowing you to mix everything in one go without needing to stop and transfer dough.
Durable construction, especially in the base and motor housing, ensures that the mixer can withstand regular use without tipping over or breaking down.
Included attachments are key for versatility; a dough hook will allow you to knead dough effectively, while a flat beater is great for combining ingredients smoothly.
Ease of clean-up is a practical consideration, as mixers with removable, dishwasher-safe parts make the post-baking process much simpler and quicker.
A good warranty offers reassurance that the stand mixer is built to last, providing protection against defects and manufacturing issues that may arise during normal use.
Why is Motor Power Critical for Making Pie Crust?
Motor power is a crucial factor when selecting a stand mixer for making pie crust, as it directly impacts the mixer’s ability to handle heavy doughs and ensure consistent results. The following points highlight why motor power is essential:
-
Mixing Efficiency: A powerful motor can efficiently mix ingredients, such as flour, butter, sugar, and water, to create a uniform dough. This is particularly important for pie crusts, where achieving the right texture is key.
-
Overcoming Resistance: When making pie crust, you often deal with tough ingredients like cold butter and flour. A stand mixer with a higher wattage motor can tackle these tougher elements without straining, ensuring the dough remains cold and flaky.
-
Speed Control: Higher motor power typically comes with better speed options. A stand mixer with variable speeds allows for gentle mixing and thorough kneading, helping to avoid overworking the dough, which can lead to a tough crust.
-
Durability: Stand mixers with strong motors tend to be more durable over time, providing consistent performance for repeated baking tasks without the fear of burnout.
Choosing a stand mixer with adequate motor power is key to achieving that flaky and tender pie crust every time.
How Does Bowl Size Affect Pie Crust Preparation?
The size of the bowl can significantly impact the preparation of pie crust using a stand mixer.
- Small Bowl: Using a small bowl can make it challenging to mix the ingredients evenly, as the ingredients may not have enough space to interact properly. This can lead to inconsistent texture in the pie crust, resulting in a less flaky and tender outcome.
- Medium Bowl: A medium-sized bowl provides a balance between mixing and space, allowing for better incorporation of ingredients. It can accommodate a variety of batch sizes, making it suitable for both single and double crust recipes, but may still require careful handling to ensure even mixing.
- Large Bowl: A large bowl is ideal for making larger batches of pie crust or for incorporating additional ingredients like fruit or spices. It allows for ample space for the dough to be mixed thoroughly without overcrowding, leading to a consistent and well-blended crust that is likely to bake evenly.
Which Stand Mixers Are Highly Recommended for Pie Crust?
When it comes to making pie crust, certain stand mixers are highly recommended for their performance and versatility:
- Kitchenaid Artisan Series 5-Quart Stand Mixer: This mixer is known for its powerful motor and 10-speed settings, making it easy to handle a variety of doughs, including pie crusts. The 5-quart bowl provides ample space for mixing larger batches, and the tilt-head design allows for easy access to the bowl and attachments.
- Sunbeam MixMaster 350 Watt Stand Mixer: This model offers a unique feature with its dual mixing action that ensures even mixing, which is essential for achieving the right texture in pie crusts. It comes with a range of attachments, including dough hooks, making it versatile for other baking needs as well.
- Bosch Universal Plus Stand Mixer: This stand mixer is particularly appreciated for its large capacity and powerful motor, suitable for mixing heavy doughs like pie crust. Its unique design allows for efficient mixing without the need for additional attachments, ensuring that ingredients are thoroughly combined.
- Hamilton Beach Electric Stand Mixer: This budget-friendly option provides solid performance with its 6-speed settings and a 4-quart bowl, making it ideal for small to medium-sized batches of pie crust. Its lightweight design and easy-to-use features make it a great choice for beginner bakers.
- Wolf Gourmet Stand Mixer: This high-end mixer is designed for serious home bakers, featuring a powerful motor and a 5-quart bowl with a unique mixing action that ensures thorough incorporation of ingredients. Its sleek design and user-friendly controls make it a joy to use, especially for complex pastry tasks like pie crusts.
What Makes These Stand Mixers Durable and Efficient?
The best pie crust stand mixers are known for their durability and efficiency, which are essential for creating the perfect crust.
- Powerful Motor: A strong motor is critical for effective mixing and kneading, allowing the mixer to handle thick doughs without straining. This ensures a consistent texture and eliminates the risk of overheating, which can compromise performance over time.
- Robust Construction: Stand mixers made from high-quality materials, such as metal housings and stainless steel bowls, are designed to withstand the rigors of frequent use. Such construction not only enhances durability but also minimizes vibrations, providing stability during operation.
- Multiple Speed Settings: Having a range of speed options allows for precise control over mixing and kneading, ensuring that ingredients are combined thoroughly without overworking the dough. This versatility is particularly beneficial when making pie crusts, as it helps achieve the desired flakiness.
- Attachments and Accessories: Many stand mixers come with a variety of attachments, such as dough hooks and flat beaters, tailored for specific tasks. These specialized tools enhance efficiency by optimizing mixing processes, making it easier to achieve the perfect pie crust with minimal effort.
- Easy Cleanup: Models with dishwasher-safe parts and a design that minimizes crevices make cleanup easier, encouraging regular use. This convenience ensures that bakers spend less time on maintenance and more time perfecting their pie crust recipes.
How Can You Use a Stand Mixer to Perfect Your Pie Crust Technique?
Using a stand mixer can greatly enhance your pie crust technique by ensuring consistent results and saving time and effort.
- Choosing the Right Attachment: The paddle attachment is the best tool for mixing your pie crust ingredients as it incorporates fats and flour without overworking the dough.
- Incorporating Ingredients: Start by adding your dry ingredients, like flour, sugar, and salt, to the bowl before gradually incorporating the butter.
- Monitoring Dough Consistency: It’s important to keep an eye on the mixing process, as overmixing can lead to a tough crust.
- Chilling the Dough: After mixing, always wrap the dough in plastic wrap and refrigerate it for at least 30 minutes before rolling it out.
- Rolling Out the Dough: When it’s time to roll out the chilled dough, use a lightly floured surface and a rolling pin to achieve an even thickness.
- Cleaning Up: One of the benefits of using a stand mixer is the ease of cleanup after making pie crust.
This attachment mimics the process of cutting butter into flour by mixing at a low speed, which helps to maintain the integrity of the butter chunks, resulting in a flaky crust.
By blending the dry ingredients first, you ensure even distribution of the salt and sugar, while adding cold, cubed butter allows the mixer to combine them into a crumbly texture, which is essential for a tender pie crust.
Mix the dough just until it begins to come together, and then check for the right consistency; it should hold together when pressed but still have visible bits of butter for optimal flakiness.
This step allows the gluten to relax, making it easier to roll out and helps the fats solidify, which contributes to a tender and flaky texture once baked.
A stand mixer can help you prepare the dough quickly, but rolling it out by hand allows you to control the thickness and shape, essential for fitting into your pie dish.
Most attachments are dishwasher safe, and the bowl can simply be wiped down, making the entire process more efficient and less messy compared to traditional mixing methods.
What Techniques Can Help Achieve the Flakiest Pie Crust?
To achieve the flakiest pie crust, several techniques can be employed:
- Use Cold Ingredients: Keeping ingredients like butter and water cold is crucial as it helps to prevent gluten formation, which can lead to a tough crust. Cold butter creates steam during baking, which results in that desirable flaky texture.
- Cutting Butter into Flour: This technique involves using a stand mixer or pastry cutter to incorporate butter into flour until the mixture resembles coarse crumbs. The small pieces of butter remain intact, creating layers that expand and puff up during baking, contributing to the flakiness.
- Minimal Mixing: Overmixing the dough can develop gluten, making the crust tough rather than tender and flaky. Mixing just until the ingredients are combined ensures that the dough remains delicate.
- Resting the Dough: Allowing the dough to rest in the refrigerator for at least an hour before rolling it out helps relax the gluten strands. This step also keeps the butter cold, which is essential for achieving that flaky texture when baked.
- Using a Stand Mixer: A stand mixer can efficiently mix the dough without warming the ingredients too much. It provides consistent results and can easily incorporate the fat into the flour, making the process quicker and more manageable.
- Rolling Technique: When rolling out the dough, use light pressure and avoid stretching the dough. Rolling from the center outward helps maintain an even thickness and prevents the dough from becoming tough.
- Baking with Weights: Using pie weights or beans when blind baking the crust can prevent it from puffing up and ensures even baking. This technique allows the crust to maintain its structure and creates a crispy layer, enhancing the flake.
How Do You Properly Maintain Your Stand Mixer for Long-Lasting Performance?
Proper maintenance of your stand mixer ensures its longevity and optimal performance, especially when making the perfect pie crust.
- Regular Cleaning: It’s essential to clean your stand mixer after each use to prevent the buildup of flour, sugar, and grease.
- Checking the Attachments: Inspect the mixing bowl and attachments for any signs of wear or damage before each use.
- Lubricating Moving Parts: Periodically lubricate the gears and moving parts to ensure smooth operation and prevent any potential grinding noises.
- Storing Properly: Store your stand mixer in a dry place to avoid moisture damage, and cover it to prevent dust accumulation.
- Using the Right Speed: Utilize the appropriate speed settings for different tasks, as overworking the motor can lead to premature wear.
Regular cleaning helps maintain hygiene and can prevent flavors from previous mixing tasks from affecting your pie crust. Use a damp cloth to wipe down the exterior and wash the mixing bowl and attachments in warm, soapy water, ensuring they are thoroughly dried before reassembling.
Checking the attachments for damage, such as cracks or bends, is crucial because defective parts can affect the mixing efficiency and result in poorly made pie crusts. Replace any damaged attachments promptly to maintain the quality of your baking.
Lubricating moving parts is vital as it reduces friction and wear on the internal components. Use food-safe grease and refer to the manufacturer’s instructions for specific lubrication points to keep your mixer running smoothly.
Storing your stand mixer properly prevents environmental damage that could hinder its function, while a cover can keep dust and debris out of the machine’s crevices. Ensure it is set up on a stable surface to avoid accidents during usage.
Using the right speed for different tasks prevents overloading the motor, which can lead to overheating and damage. When making pie crust, start with low speeds to incorporate ingredients and gradually increase as necessary to achieve the desired consistency.
Related Post: