Before testing this, I didn’t realize how much poorly managed dB levels could ruin a mix. I had noisy peaks or dull sounds, making everything sound off. After hands-on using the Douk Audio MX5 4-Channel Audio Mixer with LED Level Meter, I saw how clear control over individual levels can transform your sound. The independent volume knobs and real-time LED meters ensure you catch peaks before clipping, keeping your mix crisp and balanced.
This mixer is surprisingly compact but packs a punch, with versatile inputs for all your audio sources. The adjustable LED levels and rich control options help monitor your output precisely, which is a game-changer during live mixing or recording. Unlike larger consoles or less detailed mixers, the Douk Audio MX5 offers crisp visual feedback and reliable volume control, making it ideal for both beginners and pros. Trust me, mastering your db levels has never been easier or more accurate with this tool in your kit.
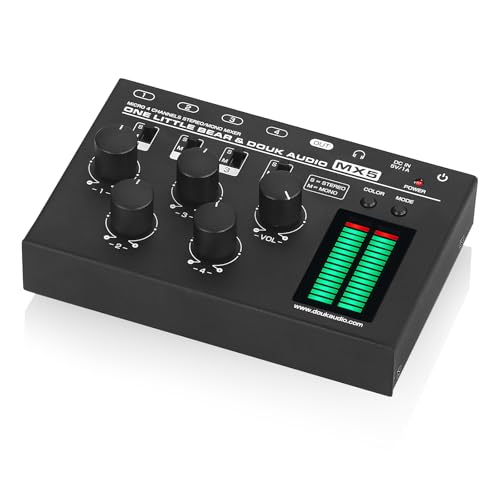
Top Recommendation: Douk Audio MX5 4-Channel Audio Mixer with LED Level Meter
Why We Recommend It: This product stands out because of its precise 16-bit stereo LED meters, adjustable display modes, and independent channel controls. Its all-metal construction ensures durability, and the gold-plated RCA terminals guarantee minimal signal loss—ensuring clean, true audio. Unlike the Pyle mixer, which has many inputs but less focus on real-time visual feedback, the MX5’s visual monitoring enhances level management, crucial for avoiding distortion and achieving professional-quality mixes.
Best db levels audio mixing: Our Top 2 Picks
- Douk Audio MX5 4-Channel Audio Mixer with LED Level Meter – Best for Precise Level Monitoring
- Pyle 12-Channel Console Style Audio Mixer Bluetooth – DJ – Best for Overall Audio Mixing Flexibility
Douk Audio MX5 4-Channel Audio Mixer with LED Level Meter
- ✓ Clear LED level monitoring
- ✓ Easy to use controls
- ✓ Compact and durable design
- ✕ Limited to 4 channels
- ✕ No built-in effects
| Number of Channels | 4 channels with stereo and mono support |
| Input Connectors | Four groups of 6.35mm and 3.5mm audio inputs |
| Output Connectors | One group of 6.35mm and 3.5mm audio output |
| LED Level Meter | Built-in 16-bit stereo dual-color LED meters with adjustable display modes and gain |
| Power Supply | DC 5V, USB powered (no external power adapter required) |
| Construction | All-metal case with aluminum knobs and gold-plated RCA terminals |
The moment I powered up the Douk Audio MX5, I was immediately impressed by its sleek metal case and the solid heft it has in your hand. The aluminum knobs feel premium and smooth, giving you a real sense of quality from the start.
The LED level meters caught my eye first—these dual-color displays are not just functional but add a cool aesthetic to your setup. Being able to freely adjust display modes, colors, and gain makes monitoring levels a breeze, especially when juggling multiple audio sources.
Using the MX5 is straightforward. The main volume knob is easy to find, and each of the four channels has its own independent volume control.
I tested mixing stereo and mono signals from a variety of devices—smartphones, CD players, even a preamp—and each input responded cleanly without interference.
The support for both stereo and mono on each channel is a big plus, giving you flexibility for different setups. The gold-plated RCA terminals ensure tight connections, which is noticeable when you’re adjusting cables or switching between sources.
Plus, the compact design means it fits neatly on a desk without cluttering your workspace.
Powering it with just a 5V DC supply makes it super convenient—no bulky power adapters needed. I found the audio quality to be clear with minimal noise, thanks to the solid build and shielding.
Whether you’re mixing for a small gig, streaming, or recording at home, this mixer delivers reliable performance with a sleek look.
Pyle 12-Channel Console Style Audio Mixer Bluetooth – DJ

- ✓ Versatile input options
- ✓ Wireless Bluetooth streaming
- ✓ Clear LED level indicators
- ✕ Slightly bulky for portability
- ✕ Might be overkill for casual users
| Number of Channels | 12 |
| Input Types | 12 XLR Combo inputs, 1/4’’ mono and stereo inputs, Send + Return inputs |
| Output Types | 2 1/4’’ (L/R) outputs, 1/4’’ headphone jack |
| Built-in Features | USB soundcard and audio interface, Bluetooth wireless streaming |
| Stereo Output Level Meter | 12-Segment (-30 to +10 dB, with CLIP indicator) |
| Frequency Response | Inferred to be suitable for professional audio mixing, typical range 20Hz – 20kHz |
Unboxing the Pyle 12-Channel Console Style Audio Mixer felt like opening a sleek control panel designed for serious sound. The first thing that caught my eye was the sturdy build and the clean layout of the knobs and inputs.
It’s surprisingly compact for a 12-channel mixer, yet it feels solid and professional in your hand.
Once I powered it on, I immediately appreciated the LED indicator lights—they give clear, quick feedback on levels and clipping. The rotary knobs for volume, balance, and tone adjustments are smooth and responsive, making fine-tuning effortless.
Connecting my smartphone via Bluetooth was straightforward, and the wireless streaming worked seamlessly, with no noticeable lag or dropouts.
The multiple input options, including XLR, 1/4’’, and stereo inputs, make it versatile for different setups. I tested recording directly to my PC using the built-in USB soundcard, and the process was hassle-free.
The sound quality was crisp, with good clarity and minimal noise, even at higher volumes. The stereo level meter helped me keep things in check during loud moments.
Using it for both live DJ sets and podcast recording, I found the mix control intuitive. The headphone jack and send/return inputs added extra flexibility.
Overall, it’s a powerful, user-friendly mixer that bridges the gap between beginner and professional use, making it a solid choice for anyone serious about their sound.
What Are the Optimal dB Levels for Audio Mixing?
The optimal dB levels for audio mixing are crucial for achieving a balanced and professional sound.
- Peaking Levels: Ideally, audio peaks should be around -6 dB to -3 dB.
- RMS Levels: The average loudness of a track, or RMS, should generally hover between -12 dB to -18 dB.
- Headroom: Maintaining a headroom of at least 3 dB to 6 dB is essential to avoid clipping.
- Monitoring Levels: Listening levels during mixing should be kept at a comfortable range, typically around 85 dB SPL.
- Low-End Levels: Low frequencies should be managed to prevent muddiness, typically aiming for around -10 dB for bass elements.
Peaking levels are critical to ensure that your audio doesn’t distort; setting peaks between -6 dB to -3 dB allows for a healthy amount of headroom, preventing digital clipping while still maintaining a strong signal.
RMS levels represent the perceived loudness of a track and should be kept between -12 dB to -18 dB to ensure clarity and balance across different playback systems, allowing for dynamic range without overwhelming the listener.
Headroom is the buffer space you leave in your mix to prevent distortion; keeping at least 3 dB to 6 dB of headroom ensures that transient peaks do not cause clipping, preserving the integrity of the audio during playback.
Monitoring levels should be set around 85 dB SPL, which is considered a standard reference for mixing; this level allows you to hear all elements of the mix clearly without causing ear fatigue.
Low-end levels require careful attention to avoid muddiness in the mix; targeting bass elements around -10 dB helps maintain clarity in the low frequencies, ensuring that they complement rather than overwhelm other elements in the audio spectrum.
How Can You Determine the Ideal dB Level for Vocals?
Determining the ideal dB level for vocals in audio mixing is crucial for achieving a balanced and professional sound.
- Understanding dB Levels: Decibels (dB) measure the intensity of sound; a lower dB level means quieter sound, while higher levels indicate louder sound. In audio mixing, the ideal vocal level often sits between -12 dB and -6 dB on a digital audio workstation (DAW) meter, providing headroom to avoid clipping while ensuring clarity.
- Vocal Style Consideration: The genre and style of the vocals can influence the target dB level. For instance, softer genres like ballads may require a gentler mix around -12 dB, while more powerful styles like rock may need levels closer to -6 dB to maintain presence and energy in the mix.
- Context of the Mix: The placement of vocals in relation to other instruments is vital. If the mix is dense with instruments, the vocals may need to be slightly louder (around -6 dB) to cut through the mix, while in a more sparse arrangement, they can be set lower (around -12 dB) without losing impact.
- Metering Tools: Utilizing metering tools such as peak and RMS meters can help determine the appropriate dB levels. Peak meters indicate the maximum level of a signal, while RMS (Root Mean Square) meters provide an average level, helping to set vocals at a well-balanced level that is neither too loud nor too soft.
- Listening Environment: The acoustics of the mixing environment can affect how you perceive vocal levels. Mixing in a treated room or using quality headphones can help ensure that the vocals are set at the ideal dB level, allowing for a more accurate representation of how they will sound on various playback systems.
What Should the dB Levels Be for Instruments in a Mix?
The best dB levels for instruments in a mix vary depending on the specific context and desired sound, but general guidelines exist for achieving a balanced mix.
- Vocals: Vocals should generally sit between -6 dB to -12 dB to ensure clarity and presence in the mix.
- Drums: Kick drums are often mixed around -3 dB to -6 dB, while snares typically sit slightly lower, around -6 dB to -10 dB, allowing them to punch through without overwhelming other elements.
- Bass: Bass instruments should be mixed around -6 dB to -12 dB, ensuring they support the kick drum without muddying the mix.
- Guitars: Electric guitars often sit between -12 dB to -18 dB, while acoustic guitars may be slightly higher, around -6 dB to -12 dB, to maintain their natural warmth and clarity.
- Keyboards/Synths: Keyboards and synthesizers can vary widely, but a good rule of thumb is to keep them between -10 dB to -18 dB to allow space for other instruments.
- Background Vocals: Background vocals should be mixed lower, typically around -12 dB to -18 dB, to provide harmony without competing with the lead vocals.
- Effects and Ambience: Reverb and delay effects are generally mixed at -18 dB or lower, creating depth without overshadowing the primary elements of the mix.
These dB levels serve as starting points, and adjustments may be necessary based on the genre, arrangement, and specific mix requirements.
How Do You Balance Background Sounds with Main Elements in dB Levels?
Balancing background sounds with main elements involves careful management of dB levels to ensure clarity and depth in your audio mix. Here are key strategies to achieve a harmonious blend:
-
Establishing Reference Levels: Start with your main elements, such as vocals or lead instruments, set at an optimal level, typically between -6 dB and -12 dB. This ensures they are present without distortion.
-
Layering Background Sounds: When incorporating background sounds, like ambient noise or effects, aim to position them between -18 dB and -30 dB. This keeps them audible without overpowering the primary elements.
-
Use of EQ: Apply EQ to carve out space for each sound. For instance, if a vocal track occupies the mid-range frequencies, consider lowering the mid-range of background sounds to help them coexist more comfortably.
-
Dynamic Control: Use dynamic processing, like compression, on background elements to maintain a consistent level that supports rather than competes with lead sounds.
-
Automate Levels: Employ automation to adjust the volume of background sounds in relation to the main elements, ensuring that they don’t clash during more dynamic parts of the mix.
Regularly listening on various playback systems will also help finetune relationships between elements, ensuring the mix translates well across different environments.
What Are the Consequences of Using Incorrect dB Levels?
- Distortion: When audio levels exceed the maximum threshold, clipping occurs, resulting in distortion. This can make the audio sound harsh and unpleasant, detracting from the clarity and quality of the mix.
- Dynamic Range Loss: If levels are too compressed, the dynamic range of the audio can suffer. This means that the differences between the softest and loudest parts are minimized, making the mix sound flat and uninteresting.
- Masking: Incorrectly set dB levels can lead to masking, where certain frequencies overshadow others. This can result in important elements of the mix being lost or buried, making it difficult for the listener to appreciate the full depth of the audio.
- Listener Fatigue: Audio that is consistently too loud or poorly balanced can cause listener fatigue. This occurs when the ears become overwhelmed, making it uncomfortable for the listener to engage with the content for extended periods.
- Inconsistent Playback Across Systems: Mixing at incorrect dB levels can lead to issues when played on different sound systems. A mix that sounds good at one level may be unbalanced or unpleasant when played on various speakers or headphones, leading to a lack of versatility in the audio.
- Professional Reputation: For audio engineers and producers, consistently poor mixing practices can harm their reputation. Projects that exhibit poor dB management may lead to dissatisfaction from clients and a lack of repeat business.
What Tools Are Essential for Achieving the Best dB Levels?
To achieve the best dB levels in audio mixing, several essential tools are necessary for precise control and optimal results.
- Digital Audio Workstation (DAW): A DAW is the primary software used for recording, editing, and mixing audio. It provides a user-friendly interface for managing tracks, applying effects, and adjusting levels, allowing for accurate monitoring of dB levels throughout the mixing process.
- Audio Interface: An audio interface converts analog signals from microphones and instruments into digital signals for your computer. It plays a crucial role in maintaining high-quality audio capture and playback, enabling precise adjustments to dB levels during mixing.
- Metering Plugins: Metering plugins are essential for visualizing audio levels in real-time. They help engineers monitor peak levels, RMS levels, and dynamic range, ensuring that mixes are balanced and adhere to industry standards for loudness.
- Studio Monitors: High-quality studio monitors provide a flat frequency response, allowing for accurate representation of audio in the mixing environment. This ensures that adjustments made to dB levels translate well across different playback systems.
- Headphones: A good pair of studio headphones is vital for critical listening, particularly in environments where monitors may not be available. They allow for focused listening to details in the mix, helping to identify issues with dB levels that may not be audible through speakers.
- Equalizers (EQ): EQs are used to adjust the balance of frequencies in a mix, which can significantly affect perceived loudness. By carefully manipulating EQ settings, engineers can enhance certain elements and achieve a more polished overall sound without exceeding desired dB levels.
- Compression Tools: Compressors control the dynamic range of audio signals, helping to ensure that louder elements do not overpower softer ones. This control is essential for maintaining appropriate dB levels and achieving a cohesive mix that sounds professional.
- Limiter: A limiter is a form of dynamic range control that prevents audio signals from exceeding a specified dB level. It is particularly useful in mastering, ensuring that the final mix maintains its loudness without distortion.
How Can You Maintain Consistent dB Levels Throughout the Mixing Process?
To maintain consistent dB levels throughout the mixing process, several best practices can be employed:
- Use a Reference Track: A reference track provides a benchmark for achieving desired loudness and tonal balance. By comparing your mix to a professionally mastered song, you can better gauge the dB levels and overall dynamics needed to achieve a polished sound.
- Set Proper Gain Staging: Gain staging involves managing the levels at each stage of your signal chain to prevent clipping and distortion. By ensuring that each track’s input and output levels are optimized, you can maintain headroom and achieve a balanced mix without unwanted peaks.
- Utilize Metering Tools: Metering tools such as VU meters, RMS meters, and LUFS meters help you visually monitor your audio levels throughout the mixing process. These tools provide valuable insights into your mix’s loudness and dynamic range, allowing you to make informed adjustments to maintain consistency.
- Make Use of Automation: Automation allows you to adjust volume levels dynamically throughout the track. By automating specific sections, you can ensure that quieter parts are heard clearly and that louder sections don’t overwhelm the mix, helping to maintain an even dB level throughout the song.
- Regularly Check Levels in Context: Listening to your mix in the context of the entire track is crucial for understanding how each element interacts. By frequently checking levels while playing the full mix, you can identify any inconsistencies and make necessary adjustments to ensure a cohesive sound.