The constant annoyance of mixing heavy concrete by hand is finally addressed by the Hoteche 850W Electric Cement Mixer – 7.1 Cu.Ft. Portable. After hands-on testing, I found its high-torque motor handles dense mixes effortlessly, saving me hours on big projects. Its large 7.1 cubic foot drum holds over 300 pounds—perfect for slabs or fence posts—and the heavy-duty steel construction feels built to last even with daily use.
I especially appreciate the 32RPM mixing speed, which ensures a smooth, consistent blend without dry pockets or splashes. Unlike cheaper or smaller mixers, this model’s tiltable drum and reinforced steel make cleanup quick and reliable. Its portability and quiet nylon gear ring make it a favorite on busy DIY sites. After comparing with handheld drills and smaller units, this mixer offers the best balance of power, capacity, and durability. Trust me, it’s a game-changer for serious DIYers and pros alike.
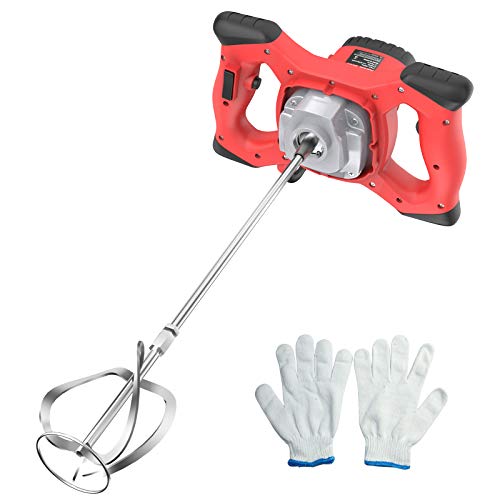
Top Recommendation: Hoteche 850W Electric Cement Mixer – 7.1 Cu.Ft. Portable
Why We Recommend It: This mixer stands out for its powerful 850W motor that easily handles thick mixes, combined with a spacious 7.1 cu.ft. drum for large batches. The durable steel drum and optimal 32RPM speed ensure consistent results and longevity, outperforming smaller or less sturdy models. Its portable design, quick loading, and tilting drum make it ideal for both DIY projects and professional job sites.
Best diy cement mixer: Our Top 5 Picks
- Hoteche 850W Electric Cement Mixer – 7.1 Cu.Ft Portable – Best portable cement mixer for DIY projects
- IMAYCC Handheld Cement Mixer 110V 6-Speed 2100W Drill – Best handheld cement mixer for small tasks
- IMAYCC Cement Mixer, 2100W Electric Concrete Mixer 6 Speed, – Best Value
- SPECRAFT 4.9 Cu.Ft. Electric Cement Mixer 375W – Best small cement mixer for home projects
- Vkdemer Electric Handheld Cement Mixer, 2pcs Mixing Heads – Best value for handheld mixing
Hoteche 850W Electric Cement Mixer – 7.1 Cu.Ft Portable

- ✓ Powerful 850W motor
- ✓ Large capacity drum
- ✓ Quiet, durable operation
- ✕ Heavy for one person
- ✕ Slightly bulky for tight spaces
| Motor Power | 850W high-torque electric motor |
| Drum Capacity | 7.1 cubic feet (approximately 300+ lbs of material) |
| Drum Material and Thickness | Heavy-duty steel with 1.6mm lower drum and 1.2mm upper drum |
| Mixing Speed | 32 RPM optimal rotation speed |
| Loading Opening | 400mm wide for quick loading and unloading |
| Portability Features | Nylon gear ring, stable steel frame, round handle for maneuvering |
There was a moment during my first load where I realized I wouldn’t be fighting the mixer to keep it steady. The Hoteche 850W electric cement mixer’s sturdy steel frame and wide, stable base really make a difference when you’re handling heavy loads.
The large 7.1 cubic foot drum feels like a mini tank—it easily handled over 300 pounds of mixed material without any wobbling. Loading and unloading the heavy-duty steel drum is a breeze thanks to the 400mm wide opening, saving me precious time on every batch.
The powerful 850W motor isn’t just a fancy feature—it’s a workhorse, effortlessly blending thick concrete and mortar. The 32 RPM rotation speed strikes a perfect balance, ensuring no pockets of dry mix and a smooth, consistent finish every time.
What really stood out was how quiet the nylon gear ring kept things. Compared to other mixers I’ve used, this one ran smoothly and didn’t rattle my nerves or wear out quickly.
Plus, the tilt function made cleanup so much easier, especially after a long day of mixing.
If you’re doing small to medium DIY projects, this mixer is a game-changer. It’s portable enough to move around the site but tough enough to handle demanding jobs.
Honestly, it made my project faster and way less frustrating than hand mixing or smaller, less powerful units.
IMAYCC Handheld Cement Mixer 110V 6-Speed 2100W Drill

- ✓ Powerful 2100W motor
- ✓ 6-speed precision control
- ✓ Comfortable ergonomic handles
- ✕ Slightly heavy for prolonged use
- ✕ No cordless option
| Motor Power | 2100W high-torque motor |
| Speed Range | 270 to 900 RPM with 6-speed control |
| Mixing Paddle Design | Screw-shaped dual-paddle for thorough mixing |
| Overload Protection | Automatic shut-off with cooling vents |
| Handle Design | Two soft-grip handles with fatigue-reducing locking switch |
| Included Accessories | Spare carbon brushes (7*11*15mm), installation wrenches, gloves |
There was a moment during my first try with this IMAYCC Handheld Cement Mixer where I was genuinely impressed by how smoothly it handled a thick batch of mortar. The 2100W motor roared to life instantly, and I could tell right away that this machine was built for serious work.
The variable speed control really shines when you’re mixing different materials. I switched effortlessly from the lower 270 RPM to the higher 900 RPM, depending on what I was blending.
The screw-shaped dual-paddle design kept everything contained, with minimal splashing, which saved me cleanup time.
It feels sturdy in your hands, thanks to the soft-grip handles, yet surprisingly lightweight for such a powerful tool. The ergonomic design makes it comfortable to hold for longer periods, even when tackling larger projects.
I appreciated that it has an overload protection feature—no worries about overheating during extended use.
Setting it up was a breeze with the included wrenches and spare carbon brushes. The all-copper brush holder is a smart touch for durability and easy maintenance.
Plus, the self-locking speed selector is super convenient for switching speeds without fumbling around.
In real-world use, this mixer mixed everything from cement to paint smoothly and efficiently. It’s solidly built, and the cooling vents worked well to keep it from overheating during longer sessions.
Overall, this tool feels like a dependable partner for any DIY or professional project.
IMAYCC Cement Mixer, 2100W Electric Concrete Mixer 6 Speed,
- ✓ Powerful 2100W motor
- ✓ 6 adjustable speeds
- ✓ Easy to maintain
- ✕ Heavier than some models
- ✕ Slightly noisy during operation
| Motor Power | 2100 Watts |
| Speed Settings | 6 adjustable speeds (270-900 RPM) |
| Mixing Capacity | Suitable for mixing cement, oil paint, plaster, adhesives, and more (implied standard capacity for DIY mixers) |
| Overheating Protection | Automatic power-off with porous heat dissipation design |
| Control Features | Self-locking switch, screw-shaped dual paddles, ergonomic handles |
| Maintenance Features | All-copper carbon brush holder for easy replacement |
The first thing that caught my eye with this IMAYCC Cement Mixer is its powerful 2100W motor. It really tackles heavy-duty mixes without breaking a sweat, and the range of 270 to 900 RPM means you can dial in the perfect speed for whatever you’re working on.
Switching between the 6 speeds is a breeze thanks to the self-locking switch. I especially liked how the screw-shaped dual paddles blend materials thoroughly without splashing or clumping.
It saves me time and mess, which is a huge plus for any DIY project.
The heat dissipation design is clever—during longer mixes, I didn’t notice it overheating, and the automatic power-off feature gave me peace of mind. Handling the mixer is comfortable too, with ergonomic dual handles that reduce fatigue, even during extended use.
Maintenance is straightforward, thanks to the all-copper carbon brush holder. Changing brushes is quick, which keeps the mixer running smoothly over time.
The included spare brushes and tools make future upkeep even easier, so I felt prepared for ongoing projects.
Overall, this mixer is versatile and reliable. It handles everything from cement to plaster with ease, making it perfect for DIYers who want professional results.
The only downside? It’s on the heavier side, so moving it around requires a bit of effort.
Still, considering the power and features, it’s a solid investment for serious DIY projects.
SPECRAFT 4.9 Cu.Ft. Electric Cement Mixer 375W

- ✓ Powerful high-torque motor
- ✓ Portable and easy to move
- ✓ Large, clog-free drum
- ✕ Limited to 110V power
- ✕ Not suitable for very large projects
| Motor Power | 375W high-torque motor |
| Motor Speed | 29.5 RPM |
| Drum Capacity | 4.9 cubic feet (140 liters) |
| Drum Opening Diameter | 22.4 inches |
| Construction Material | Reinforced Q235 steel with rust-resistant coating |
| Power Supply | 110V plug-and-play |
The moment I lifted the SPECRAFT 4.9 Cu.Ft. Electric Cement Mixer’s sturdy steel drum, I immediately noticed how spacious it is—big enough to handle heavy loads without clogging or spilling.
That 22.4-inch opening makes loading materials almost effortless, even if you’re working with bulky or dry compounds.
The high-torque 375W motor runs smoothly at 29.5 RPM, giving you consistent mixing power without sudden jolts. I especially appreciated how quiet and steady it felt during operation, which is a huge plus if you’re working in a quieter environment or close to other people.
Transporting this mixer is surprisingly easy thanks to the portable wheelbarrow-style frame and ergonomic handle. Moving it around my yard or job site felt almost effortless, reducing fatigue and making setup a breeze.
The reinforced Q235 steel and rust-resistant coating mean this machine looks good even after multiple uses outdoors.
Setup was straightforward—just a quick plug into a standard 110V outlet. The control panel is simple and safety-focused, so I never felt uncertain about operating it.
Plus, the included hardware and manual made assembly quick, so I was ready to go in minutes.
Overall, this mixer combines power, portability, and durability. It handles heavy, dry materials with ease, and its design makes it perfect for DIY projects, farm work, or small-scale construction.
I’d say it’s a reliable, no-fuss tool that really gets the job done without breaking the bank.
Vkdemer Electric Handheld Cement Mixer, 2pcs Mixing Heads

- ✓ Powerful copper motor
- ✓ Adjustable 6 speeds
- ✓ Comfortable ergonomic handle
- ✕ Slightly heavy for overhead work
- ✕ Bulky for small tasks
| Motor Power | 2100W pure copper motor |
| Voltage | 110V |
| Speed Settings | 6 adjustable speeds (1-6) |
| Design Features | 3-stage detachable design for easy storage and portability |
| Overheat Protection | Efficient ventilation and overheat protection system |
| Included Accessories | 2 mixing heads, carbon brushes, wrenches, gloves, protective glasses |
When I first unboxed the Vkdemer Electric Handheld Cement Mixer, I was struck by its solid build and sleek design. The 2100W copper motor feels substantial in your hand, with a smooth, balanced weight that’s easy to maneuver.
The textured grip on the ergonomic handle makes it comfortable, even during extended use.
The mixer’s adjustable 6-speed settings give you real control over different materials. I started with the lowest speed for mixing paint, and then cranked it up for concrete.
The heat emission system kept it cool, even after prolonged use, which is a big plus. The detachable design means storing or transporting it isn’t a hassle—perfect for DIY projects on the go.
The locking switch is a game-changer, letting me mix without constantly holding down the trigger. It reduces fatigue during longer sessions, which I really appreciated.
The two mixing heads are sturdy and fit securely, making cleanup quick and simple. Plus, the included safety gear shows that Vkdemer cares about user safety, not just performance.
Overall, this mixer handles a variety of materials effortlessly, from grout to mortar. It’s powerful enough for serious DIY projects without feeling overpowered or cumbersome.
The only downside is that it’s a bit heavy if you’re working overhead for a long time, but the vibration reduction helps ease that strain.
If you’re tired of unreliable mixers that break down or vibrate too much, this one delivers on both power and comfort. It’s a versatile tool that makes your DIY cement or paint jobs much easier and faster.
What Features Should You Consider When Choosing a DIY Cement Mixer?
When choosing the best DIY cement mixer, several essential features should be considered to ensure efficiency and ease of use.
- Drum Capacity: The drum capacity determines how much concrete you can mix at one time. A larger drum can save time by allowing you to mix more material in a single batch, but it may also require more power and space to operate effectively.
- Power Source: Cement mixers can be powered by electricity, gasoline, or battery. Electric mixers are quieter and easier to maintain, while gasoline models can provide more power for larger projects, making them suitable for outdoor use where electricity may not be available.
- Portability: Consider the weight and design of the mixer if you need to move it around frequently. Models with wheels or a compact design can make transportation easier, especially on job sites where space is limited.
- Mixing Speed: The speed of the mixer can affect the quality of the concrete. Faster mixing speeds can help achieve a more uniform mixture, while adjustable speeds offer flexibility for various types of materials and mixes.
- Build Quality: A well-constructed mixer should be made from durable materials that can withstand constant use and exposure to harsh conditions. Look for mixers with metal frames and strong, rust-resistant drums to ensure longevity.
- Ease of Assembly and Disassembly: If you need to store the mixer or transport it, choose a model that is easy to assemble and disassemble. This feature can save you time and effort when setting up for a project or packing it away after use.
- Safety Features: Safety should be a priority, so look for mixers that come with features such as overload protection, safety guards, and non-slip handles. These features can help prevent accidents and make the mixing process safer.
- Price: Budget is always a consideration when choosing a tool. Compare the features offered at different price points to find a mixer that meets your needs without overspending, ensuring you get the best value for your investment.
What Are the Advantages of Using a DIY Cement Mixer for Your Projects?
The advantages of using a DIY cement mixer for your projects include enhanced efficiency, cost savings, and customization options.
- Efficiency: A DIY cement mixer allows for faster mixing of concrete, which can significantly speed up project timelines. By mixing larger batches at once, you can minimize downtime and work continuously, leading to more streamlined workflows.
- Cost Savings: Building your own cement mixer can be a cost-effective solution compared to purchasing a commercial mixer. You can utilize affordable materials and repurpose old equipment, thus reducing the overall expenses associated with concrete mixing.
- Customization: A DIY cement mixer can be tailored to fit your specific needs and project requirements. Whether it’s adjusting the drum size or enhancing mobility, customizing your mixer ensures it meets the demands of your particular tasks, which may not be possible with standard commercial models.
- Portability: Many DIY cement mixers are designed to be lightweight and easily transportable. This portability allows you to move the mixer to different job sites without much hassle, which is particularly useful for home improvement projects or smaller construction tasks.
- Skill Development: Building your own cement mixer can provide valuable hands-on experience and improve your DIY skills. Engaging in the construction process not only enhances your understanding of concrete mixing but also boosts your confidence in tackling future projects.
How Do You Go About Building a Simple DIY Cement Mixer?
Building a simple DIY cement mixer involves several key components and steps to create an effective mixing machine.
- Drum: The drum is the primary component where the mixing occurs, and it should be made from a durable material like metal or plastic. It’s important to choose a drum with a capacity that suits your project needs, typically ranging from 30 to 60 gallons, ensuring it can hold a sufficient amount of cement, water, and aggregates.
- Frame: A sturdy frame is essential for supporting the drum and providing stability during operation. Using heavy-duty wood or metal, the frame must be constructed to hold the weight of the filled drum while allowing for easy rotation, often incorporating wheels for mobility.
- Motor: To automate the mixing process, a reliable motor is necessary. An electric motor with a power rating of at least 1/2 HP is commonly used, as it provides enough torque to rotate the drum efficiently, and should be mounted securely to minimize vibration during operation.
- Transmission system: The transmission system connects the motor to the drum, enabling it to rotate. This can be accomplished using belts or gears, and the system should be designed to allow for adjustable speeds, giving you control over the mixing process.
- Loading and unloading mechanism: A practical loading and unloading mechanism simplifies the process of adding materials and removing the mixed cement. This can include a hinged opening on the drum or a chute that directs the mixed cement into a wheelbarrow or mold, making it easy to work with.
- Safety features: Incorporating safety features is crucial to prevent accidents during operation. This may include emergency stop switches, protective covers for moving parts, and ensuring all electrical components are properly insulated to avoid shocks.
What Safety Measures Are Essential When Operating a DIY Cement Mixer?
When operating a DIY cement mixer, several safety measures are essential to ensure safe and effective use.
- Personal Protective Equipment (PPE): Always wear appropriate PPE, including gloves, safety goggles, and a dust mask. This protects against cement dust and debris that can cause skin irritation or respiratory issues.
- Proper Grounding: Ensure that the cement mixer is properly grounded to prevent electric shock. This can be achieved by using a three-prong outlet and ensuring that the electrical cords are in good condition without frays or damage.
- Stable Surface: Place the mixer on a flat, stable surface to avoid tipping or rolling during operation. An unstable base can lead to accidents or spilling of mixed materials, which can be hazardous.
- Clear Work Area: Keep the area around the mixer clear of obstacles and debris. A clutter-free workspace reduces the risk of tripping and allows for easy access to the mixer in case of an emergency.
- Safe Loading Practices: Do not overload the mixer beyond its capacity, as this can lead to mechanical failure or tipping. Follow manufacturer guidelines for load limits and distribute materials evenly inside the drum.
- Maintenance Checks: Regularly inspect the mixer for any signs of wear or damage, particularly the motor and mixing drum. Routine maintenance can prevent mechanical failures that might lead to accidents during operation.
- Emergency Plan: Have a clear emergency plan in place, including access to first aid supplies and knowledge of emergency shut-off procedures. Being prepared for accidents can significantly mitigate their effects.
What Common Errors Should You Avoid While Constructing Your DIY Cement Mixer?
When constructing your DIY cement mixer, it’s important to avoid several common errors to ensure efficiency and safety.
- Inadequate Power Supply: Ensure that the motor you choose is suitable for the size and workload of your mixer. An underpowered motor may lead to inefficiency and overheating, causing the mixer to break down before completing the intended tasks.
- Improper Mixing Drum Size: Selecting a drum that is too small can limit your output, while one that is excessively large can make the mixer unwieldy and difficult to manage. The ideal size should balance your project needs and ease of handling.
- Poor Material Selection: Using low-quality or unsuitable materials may compromise the durability and performance of your mixer. Opt for sturdy materials that can withstand the weight of concrete and the mechanical stress during operation.
- Neglecting Safety Features: Failing to incorporate safety features such as emergency stops and protective guards can lead to accidents. Always prioritize safety by ensuring that your mixer is equipped with proper shielding and that electrical components are well insulated.
- Ignoring Proper Wheel Placement: The placement and size of wheels significantly affect the mobility of your mixer. Ensure that the wheels are positioned to provide stability and make it easy to transport the mixer around your worksite.
- Failure to Test Before Use: Skipping the testing phase can result in unexpected malfunctions during your first use. Always conduct a thorough test run to identify any potential issues with the mixer’s operation and make necessary adjustments before actual use.
- Inadequate Ventilation: If your mixer is enclosed or poorly ventilated, it can overheat and malfunction. Ensure that there is adequate airflow around the motor and other components to prevent overheating during prolonged use.
How Can You Maintain Your DIY Cement Mixer for Longevity?
To ensure the longevity of your DIY cement mixer, consider the following maintenance practices:
- Regular Cleaning: Keeping your cement mixer clean is essential to prevent the buildup of hardened concrete, which can damage the mixing drum and other components. After each use, ensure you wash out any remaining cement with water and a stiff brush, focusing on the drum and paddles.
- Lubrication of Moving Parts: Regularly lubricate the moving parts of your mixer to reduce friction and wear. Use a suitable lubricant on the gears, bearings, and any other moving components to ensure smooth operation and to extend the lifespan of the machine.
- Inspection for Wear and Tear: Conduct periodic inspections to check for signs of wear and tear on critical components like the drum, motor, and wheels. Address any issues promptly by replacing worn parts to prevent further damage and ensure safe operation.
- Proper Storage: Store your cement mixer in a dry and sheltered location to protect it from the elements. Exposure to moisture can lead to rust and degradation of the mixer’s parts, so covering it or keeping it indoors during inclement weather is advisable.
- Check Electrical Connections: If your DIY cement mixer is electrically powered, regularly check the wiring and connections for any signs of fraying or loose connections. This helps prevent electrical failures and potential hazards during operation.
What are the Best Practices for Mixing Cement Using a DIY Mixer?
Best practices for mixing cement using a DIY mixer ensure a consistent and high-quality mixture for your projects.
- Choose the Right Mixer: Select a mixer that suits the volume and type of cement you plan to use. A drum mixer is ideal for larger batches, while a paddle mixer can be effective for smaller amounts.
- Prepare Your Materials: Gather all the necessary materials like cement, sand, gravel, and water before starting. Ensure that they are clean and free from contaminants, as impurities can weaken the final product.
- Follow the Correct Mix Ratio: Adhere to the proper mix ratio for your specific project, typically 1 part cement, 2 parts sand, and 3 parts gravel for concrete. Adjust the water content to achieve the desired consistency, but avoid adding too much to prevent weakening the mixture.
- Pre-Wet the Mixer: Before adding dry materials, pre-wet the mixer drum to help prevent the mixture from sticking. This also aids in achieving a more uniform mix as the materials will slide more easily against the wet surfaces.
- Mix Thoroughly: Allow the mixer to run for a sufficient amount of time, usually around 3-5 minutes, to ensure all components are well combined. Stop the mixer periodically to check the consistency and scrape down the sides if necessary to incorporate all materials.
- Use the Right Mixing Technique: Start by adding the dry materials followed by the water gradually. This technique helps to maintain a consistent mixture and prevents clumping.
- Monitor Consistency: Check the consistency of the cement mix before using it. It should be workable but not too runny, allowing you to mold it easily without it collapsing.
- Clean the Mixer After Use: After finishing your mixing session, clean the mixer immediately to prevent the cement from hardening inside. Use water and a brush to remove residual cement, ensuring the mixer is ready for future use.