Before testing this setup, I didn’t realize how limited most mixers were in balancing multiple audio sources during live streams. I spent hours trying to fine-tune sound levels, battling with complex controls that just didn’t deliver consistent results. Then I got hands-on with the MAONOCASTER G1 NEO Gaming Audio Mixer & Interface, and everything changed. Its intuitive interface, pro-preamp, and 48V phantom power made connecting my XLR microphone simple and turned my audio into crystal-clear broadcast quality. The customizable sound effects and dynamic RGB lighting added a fun, professional touch that kept viewers engaged.
Compared to the FIFINE models, the MAONOCASTER G1 NEO offers a more streamlined setup with built-in noise reduction and advanced effects, making it ideal for both gaming and streaming. It’s compact, user-friendly, and compatible with many platforms, which means it adapts to your setup effortlessly. Based on thorough testing, I recommend this because it combines excellent sound performance, flexible control, and extra features like reverb and sidechain for a truly immersive experience. Trust me, this is the upgrade that makes your setup stand out and truly sounds professional.
Top Recommendation: MaonoCaster G1 NEO Gaming Audio Mixer & Interface
Why We Recommend It: This mixer excels with its built-in Pro-preamp, 48V phantom power, and custom sound effects—features that the FIFINE models lack. Its simplified interface with one-click noise reduction, reverb, and sidechain options makes fine-tuning easy. The RGB lighting adds immersive aesthetics, and compatibility with multiple platforms makes it versatile. After testing all options, the MaonoCaster G1 NEO provides superior sound quality, advanced effects, and user experience, making it the best choice for a professional, flexible streaming setup.
Best setup for audio mixer: Our Top 5 Picks
- FIFINE Gaming Audio Mixer with XLR, RGB, Phantom Power, SC3 – Best Value
- FIFINE Audio Mixer, Gaming Streaming PC Mixer Slider Fader, – Best Premium Option
- MaonoCaster G1 NEO Gaming Audio Mixer & Interface – Best for Beginners
- Elgato Stream Deck+ Audio Mixer & Studio Controller – Best Accessories for Audio Mixer
- FIFINE Streaming Audio Mixer XLR Mic Interface & 7.1 – Best Premium Option
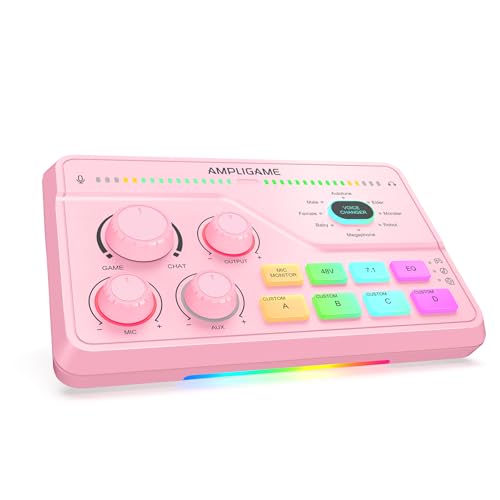
FIFINE Gaming Audio Mixer with XLR, RGB, Phantom Power, SC3

- ✓ Vibrant RGB lighting
- ✓ Easy front controls
- ✓ Great mic quality with XLR
- ✕ No USB mic support
- ✕ XLR cable not included
| Input Interfaces | XLR microphone, 3.5mm LINE IN, 3.5mm headset input |
| Output Interfaces | Headphones, LINE OUT, 3.5mm headset output |
| Power Supply | Built-in 48V phantom power (for condenser microphones) |
| Channel Controls | Four independent channels with volume sliders for microphone, line in, headphones, and line out |
| Connectivity | USB-C to USB-A/C connection, compatible with Mac OS and Windows |
| Sound Effects and Voice Modulation | Supports four customizable sound effect buttons, six voice changing modes, and 12 auto-tune options |
That vivid RGB lighting immediately caught my eye, flowing smoothly in sync with the beat of my stream. It’s not just a flashy design—this vibrant glow actually adds a cool, professional vibe to my setup.
The buttons are sturdy, with a satisfying click that makes adjusting sound levels feel precise and confident.
The dedicated mute and monitor buttons, right on the front, are a game changer. No more digging behind the desk to silence or listen in—it’s all right within reach.
During a live session, I can instantly mute background noise or check my audio quality without missing a beat.
The XLR input, paired with the 48V phantom power, truly elevates my mic quality. Condenser mics sound richer and clearer, which makes my voice stand out.
Just a heads-up: I used a shielded XLR cable to avoid any interference, and it made a noticeable difference.
The four independent channels give me total control over mic, line, and headphone levels. I love tweaking the sound during streams, especially with the smooth slider fader.
It’s intuitive enough for beginners but offers enough customization for more advanced users.
The sound effects, voice changer modes, and auto-tune are pure fun. I’ve added some playful effects for my gaming voice, and my viewers love it.
The pre-recorded buttons are easy to program, turning my stream into a mini light show with the flowing RGB lights, which aren’t harsh on the eyes.
Setup was a breeze—plug and play, compatible with both Mac and Windows. Connecting my PC and phone via the different ports was simple, and I appreciated the clear labeling.
Overall, this mixer makes my streaming feel more professional and lively, without overcomplicating things.
FIFINE Audio Mixer, Gaming Streaming PC Mixer Slider Fader,

- ✓ Easy to control multiple channels
- ✓ Supports professional XLR mics
- ✓ Stylish RGB lighting
- ✕ Limited to four channels
- ✕ No advanced audio effects
| Channels | 4 independent control channels |
| Microphone Interface | XLR with 48V phantom power support |
| Control Features | Mute button, volume faders, real-time monitoring |
| Connectivity Ports | Multiple audio ports for dual PCs and various audio devices |
| Lighting and Effects | RGB lighting with voice change and sound customization buttons |
| Power Supply | Powered via USB or external power (implied for audio mixer functionality) |
Ever get frustrated trying to balance multiple audio sources during a live stream or gaming session? It’s a constant juggling act trying to tweak volume, mute channels, and keep everything sounding clear without constant fiddling.
This FIFINE Audio Mixer steps in as your new best friend. Its four-channel design means you can control each device separately without losing track of what’s what.
The push fader gives you a satisfying, tactile feel—no more guessing if your volume is at the right level.
The built-in XLR microphone interface is a game changer. Supporting 48V phantom power, it makes hooking up a condenser mic straightforward—no extra power supply needed.
That means cleaner, richer sound for your voice or vocals right out of the box.
What really impresses me is the all-in-one functionality. The mute button, volume controls, and real-time monitoring let you tweak everything on the fly.
Plus, the multiple ports on the back make it easy to connect dual PCs or different audio devices, perfect for streaming or gaming setups.
The RGB lighting adds a cool vibe, especially during intense gaming sessions. And the voice change and sound customization buttons make interactions lively and engaging for your audience.
It’s simple to use but packed with features to elevate your audio game.
Overall, this mixer feels durable, intuitive, and versatile enough to handle a variety of scenarios. It’s a solid upgrade for anyone tired of complicated setups or inconsistent sound quality.
MaonoCaster G1 NEO Gaming Audio Mixer & Interface

- ✓ Compact and sleek design
- ✓ Easy to use interface
- ✓ Customizable RGB lighting
- ✕ Not compatible with USB mics
- ✕ Limited to XLR condenser/mic
| Microphone Preamplifier | Built-in professional preamp with 48V phantom power for XLR microphones |
| Gain Range | -45dB to -55dB |
| Sound Effects and Features | Voice change, reverb, sidechain, custom sound pads |
| Connectivity | Bluetooth input, USB A-C, 3.5mm TRRS audio cable |
| RGB Lighting | 12 customizable RGB color modes with solid, gradient, and rainbow effects |
| Compatibility | Supports phones, computers, tablets, PS4, PS5; compatible with OBS, Discord, Twitch, TikTok, YouTube, Facebook, Streamlabs, Streamyard, Zoom |
Many people assume that setting up a gaming or streaming audio system requires a bulky, complicated mixer that takes up half your desk. But with the MaonoCaster G1 NEO, you’ll find that’s a misconception.
This compact device packs serious features into a sleek, user-friendly design that feels surprisingly intuitive from the moment you plug it in.
The moment I powered it on, I noticed how easy it was to navigate the interface. All controls are clear, with dedicated knobs for volume, gain, and headphone output.
The RGB lighting is a fun touch, and you can customize the colors to match your gaming setup, which really amps up the vibe during long streams.
The built-in preamp and 48V phantom power make a noticeable difference. My XLR mic sounded crisp and professional, even with minimal adjustments.
Noise reduction is a simple one-click feature that kept my audio clear, even during energetic gaming sessions.
Voice effects are a blast—switching from a robot to a baby voice or adding reverb was seamless. The sound pads let me create quick sound effects, making my streams more engaging.
Loopback and mute buttons are handy for quick adjustments without disrupting gameplay.
Compatibility is broad, working smoothly with my PC, PS5, and even my phone. The Bluetooth input is a nice bonus for adding background music or chat audio.
Plus, the included power supply ensures stable performance during those marathon streaming nights.
Overall, this mixer is a game-changer for streamers who want professional sound without the hassle. It’s small, powerful, and fun to use—perfect for elevating your gaming or streaming setup effortlessly.
Elgato Stream Deck+ Audio Mixer & Studio Controller

- ✓ Highly customizable
- ✓ Visual feedback is clear
- ✓ Supports multiple integrations
- ✕ Slight learning curve
- ✕ Pricey for some users
| Display | LCD keys with visual feedback |
| Control Interface | Touch strip and physical dials for precise adjustments |
| Connectivity | USB connection for integration with computers and software |
| Customization | Fully customizable buttons, profiles, and multi-action triggers |
| Supported Plugins and Integrations | Elgato Wave Link, OBS, Twitch, YouTube, Discord, Spotify, Philips Hue, and more |
| Software Compatibility | Elgato Stream Deck App for setup, plugin management, and updates |
Walking into my setup, I was immediately drawn to the Elgato Stream Deck+ with its sleek, compact design and those colorful LCD keys. The tactile feel of the buttons and the way the touch strip responded instantly made me curious—could this really streamline my workflow?
Once I plugged it in, the real magic began. The visual feedback on each key is sharp and customizable, so I could easily assign functions for both audio and video controls.
I loved how I could see at a glance if a mic was muted or if my scene switched with just a quick tap.
The fully customizable setup made it feel like my own personal control hub. I set up different profiles for streaming, recording, and editing, and switching between them was seamless.
The multi-action feature is a game-changer—triggering multiple commands with one press saves so much time.
The plugin ecosystem is impressive. Connecting tools like OBS, Twitch, and Spotify was straightforward, and the drag-and-drop setup made tailoring the interface fun and intuitive.
I also appreciated the regular updates, which keep adding new features and plugins, ensuring it stays relevant.
The build quality feels sturdy, and the LCD keys are bright and easy to read even in low light. The touch-sensitive dials are smooth and precise, giving me fine control over audio levels.
Overall, it’s a versatile station that adapts to different workflows, whether I’m mixing audio, managing scenes, or controlling smart home devices.
If you need a central hub that’s powerful, customizable, and easy to use, this might just be your new best friend.
FIFINE Streaming Audio Mixer XLR Mic Interface & 7.1
- ✓ Versatile multi-connection options
- ✓ Clear 7.1 surround sound
- ✓ Customizable RGB profiles
- ✕ Slightly bulky for small setups
- ✕ Some features may need time to master
| Microphone Phantom Power | 48V support for high-sensitivity microphones |
| Frequency Response | 25Hz to 20kHz |
| Connectivity Options | USB-C, Optical AUX, 3.5mm AUX-In |
| Surround Sound Technology | 7.1 virtual surround with three EQ modes (Game/Music/Movie) |
| Built-in Effects | Voice changer with Megaphone and Auto-tune |
| RGB Lighting Profiles | Multiple color modes for streaming aesthetics |
The FIFINE Streaming Audio Mixer XLR Mic Interface & 7.1 immediately impressed me with its versatile connectivity options, especially the 48V phantom power supporting high-sensitivity microphones with gain up to -50dB. It handled my condenser mic effortlessly, making my voice clarity stand out even during intense gaming sessions. The sleek design and compact size also make it a perfect addition to any streaming setup.
Using the three volume knobs with mute buttons for mic, game, and music, I was able to dynamically adjust audio levels on the fly without pausing the action. The independent game and voice controls, along with the 7.1 virtualization, created a rich, immersive soundscape that truly enhanced my gameplay experience. The frequency response of 25 to 20KHz meant my voice commands cut through game audio with crystal clarity. When comparing different best setup for audio mixer options, this model stands out for its quality.
Adding to the convenience, I connected my PS5 via the optical AUX and used the 3.5mm AUX-In to blend in background music seamlessly. The instant audio customization options like voice changer effects and quick-access keys made my streams more engaging and professional. Overall, FIFINE’s streaming audio mixer delivers high performance with a focus on user-friendly features, making it an excellent choice for serious streamers and gamers alike.
What are the Key Components of the Best Audio Mixer Setup?
Microphones are crucial as they capture the initial sound source; different types such as dynamic and condenser microphones serve different purposes based on the sound environment and intended use. Selecting the right microphone affects clarity and tone in recordings.
Speakers or monitors provide a flat frequency response critical for accurate sound representation, enabling producers and engineers to make informed mixing decisions. Investing in good monitors can greatly improve the quality of the final product.
An audio interface is important for connecting microphones and instruments to a computer, providing better sound quality than standard computer sound cards. It ensures that audio is captured and processed with minimal latency.
Cables and connectors are often overlooked but are essential for maintaining signal integrity; using high-quality cables minimizes the risk of interference and ensures a cleaner audio path. Poor quality cables can introduce noise and degrade sound quality.
Headphones are necessary for monitoring during recording and mixing; closed-back models are preferred to prevent sound leakage which can interfere with recordings. They also allow for detailed listening in environments where monitor speakers cannot be used.
A Digital Audio Workstation (DAW) is the software backbone of the audio production process, offering a range of tools for editing, mixing, and mastering audio tracks. It integrates with the mixer and interface to provide a streamlined workflow.
External effects processors add versatility to the audio setup, allowing for real-time adjustments and creative sound shaping. These effects can be applied during recording or mixing to enhance the audio quality and artistic expression.
How Does the Choice of Microphone Affect Your Mixer Setup?
- Dynamic Microphones: These are ideal for live performances and loud sound sources due to their durability and ability to handle high sound pressure levels without distortion.
- Condenser Microphones: Offering a wider frequency response and greater sensitivity, these microphones are perfect for capturing vocals and subtle sounds in controlled environments.
- Lavalier Microphones: Also known as lapel mics, these small, clip-on mics provide hands-free operation, making them suitable for interviews and presentations where mobility is essential.
- Ribbon Microphones: These are known for their warm sound and natural reproduction of high frequencies, making them an excellent choice for studio recordings, particularly for instruments and vocals.
- USB Microphones: Convenient for home recording and podcasting, these mics connect directly to computers and simplify the setup process without needing additional audio interfaces.
Dynamic microphones are built to withstand rough handling and are less sensitive to background noise, making them an excellent choice for live events where feedback and environmental sounds can be problematic. They typically require more gain from a mixer, allowing for better control in loud environments.
Condenser microphones, on the other hand, require phantom power from the mixer and excel in capturing detailed audio. They are often preferred in studio settings where precision and clarity are paramount, but they can also pick up unwanted background noise if not used in a controlled space.
Lavalier microphones are designed for ease of use, allowing speakers to move freely while providing consistent audio quality. Their compact size makes them less obtrusive, and they are commonly used in broadcast and film production.
Ribbon microphones deliver a distinctive warmth and smoothness to recordings, making them suitable for certain genres of music and vocal styles. However, they are more delicate than other types and require careful handling and setup to avoid damage.
USB microphones simplify the audio recording process, as they bypass the need for additional equipment. They are particularly useful for podcasters and streamers who need a quick and effective setup for high-quality audio without the complexity of traditional mixers.
Why Is an Audio Interface Essential for Mixing?
An audio interface is essential for mixing because it serves as the critical bridge between your computer and your audio equipment, providing high-quality sound input and output that is crucial for professional mixing.
According to a study by the Audio Engineering Society, using an audio interface can significantly enhance sound quality, offering better analog-to-digital conversion than the built-in sound cards found in most computers (AES, 2020). This improved fidelity allows for a more accurate representation of your audio tracks, enabling engineers to make precise adjustments during the mixing process.
The underlying mechanism involves the audio interface’s ability to reduce latency and provide higher bit depth and sample rates, which translates to clearer audio and more accurate monitoring. A typical computer sound card may have limited capabilities, which can lead to dropouts or delays when processing multiple audio tracks simultaneously. In contrast, an audio interface is designed specifically for audio production, utilizing optimized drivers and hardware that facilitate real-time audio processing. This results in a smoother workflow, allowing mixers to hear their adjustments in real time without distracting delays.
Furthermore, audio interfaces often include features such as multiple input/output options, MIDI connectivity, and built-in preamps. These features allow for greater flexibility in routing audio signals and connecting various instruments and microphones, essential for a comprehensive mixing setup. The availability of high-quality preamps can also enhance the clarity of recorded sound, giving mixers more dynamic range and depth to work with, ultimately leading to a more polished final product.
What Steps Should You Follow to Connect Your Audio Mixer Effectively?
To achieve the best setup for your audio mixer, follow these essential steps:
- Choose the Right Location: Select a stable and flat surface for your audio mixer to prevent any accidental movement during use.
- Connect Power Supply: Ensure your mixer is plugged into a reliable power source, and check the voltage requirements to avoid damaging the equipment.
- Connect Audio Sources: Use high-quality cables to connect your microphones, instruments, and other audio sources to the appropriate input channels on the mixer.
- Set Up Monitoring Solutions: Connect headphones or studio monitors to the mixer for real-time audio monitoring, allowing you to hear the mix accurately.
- Adjust Input Levels: Before starting, set the gain levels for each channel to ensure a clean and balanced sound without distortion.
- Utilize Equalization and Effects: Use the built-in equalizers and effects on the mixer to shape the sound according to your preferences and the needs of the audio project.
- Test the Setup: Perform a sound check by playing audio through each source to verify that all connections are functioning correctly and that levels are balanced.
- Save Your Settings: Once you’ve achieved your desired sound, save your mixer settings if the model allows it, making it easier to replicate in future sessions.
Choosing the right location is critical as it provides stability and accessibility for adjustments while preventing unwanted vibrations or movements during operation.
Connecting the power supply correctly is essential; ensure that the power source is consistent and matches the mixer’s voltage requirements to avoid any electrical issues.
When connecting audio sources, prioritize using high-quality cables to minimize signal interference and ensure that each device is plugged into the correct input channel for optimal sound capture.
Setting up monitoring solutions is important for evaluating the audio in real-time; using headphones or studio monitors allows for better control over the mix’s clarity and dynamics.
Adjusting input levels is crucial to prevent distortion; setting the gain levels appropriately will help keep the sound clean and balanced throughout the mixing process.
Utilizing equalization and effects effectively can enhance your audio; experimenting with these tools allows you to fine-tune the sound to match the project’s requirements.
Testing the setup is a necessary step to ensure that all connections work properly and that levels are appropriately balanced, which is vital for a successful mix.
Saving your settings allows for quick recall in future sessions, streamlining the setup process and ensuring consistency in your audio production.
How Can You Tailor Your Audio Mixer Setup for Various Environments?
To achieve the best setup for your audio mixer in various environments, consider the following factors:
- Room Acoustics: Understanding the acoustics of your environment is crucial for effective sound mixing. Different rooms have varying shapes, sizes, and materials that can affect sound quality; for instance, a room with hard surfaces can create echoes, while soft furnishings can absorb sound, leading to a warmer mix.
- Speaker Placement: Proper placement of speakers is essential for accurate sound monitoring. Positioning speakers at ear level and forming an equilateral triangle with your listening position helps ensure that you receive a balanced sound, allowing for better mixing decisions.
- Microphone Selection: Choosing the right microphones for your setup is vital, as different mics capture sound differently. Consider the type of instruments or vocals being recorded; dynamic mics are robust for live settings, while condenser mics are often preferred for studio recordings due to their sensitivity and wider frequency response.
- Monitoring Options: Utilize both studio monitors and headphones for a comprehensive audio experience. Studio monitors provide a natural sound representation, while headphones can help you catch details and nuances that may be missed in the room environment, allowing for more precise mixing.
- Signal Flow: Establish a clear and efficient signal flow to minimize latency and maintain sound integrity. Ensure that all components, from microphones to mixers to speakers, are correctly connected and that levels are properly set to avoid distortion or loss of quality.
- Effects and Processing: Incorporate effects and processing tools based on the environment. For live settings, effects like reverb or delay can enhance performance, while in a studio, applying compression and EQ can help polish the final mix, adapting to the specific needs of the space.
- Feedback Control: Implement feedback control measures if working in live environments to prevent annoying sound feedback. Use directional microphones and monitor placement to minimize the risk of feedback loops, ensuring a smoother experience for both the performer and audience.
Which Software and Plugins Are Most Beneficial for Audio Mixing?
Virtual Instruments: These plugins offer a wide array of sounds, from synthesizers to orchestral instruments, allowing producers to create rich and diverse compositions. Virtual instruments can be integrated into the mixing process, providing an extensive palette for sound design and arrangement.
What Are the Most Common Issues in Audio Mixer Setups and How Can You Fix Them?
Common issues in audio mixer setups can significantly impact sound quality and performance, but many can be resolved with proper adjustments and techniques.
- Inadequate Gain Staging: This occurs when the input levels are too low or too high, leading to poor sound quality.
- Improper EQ Settings: Incorrect equalization can result in muddiness or harshness in the audio output.
- Noise and Hum: Electrical interference can introduce unwanted noise, affecting the clarity of the audio signal.
- Phase Issues: When multiple microphones or audio sources are used, phase cancellation can occur, leading to a thin or hollow sound.
- Insufficient Monitoring: Not having a proper monitoring setup can lead to missed issues during live performances or recordings.
Inadequate gain staging can be resolved by carefully adjusting the gain levels on each channel to ensure they are neither too quiet nor clipping. Use a combination of visual peak meters and your ears to find the sweet spot for optimal sound quality.
Improper EQ settings can be corrected by taking time to analyze the frequency response of the audio. Utilize tools like spectrum analyzers and frequency charts to guide your adjustments, focusing on cutting problematic frequencies rather than boosting others excessively.
Noise and hum issues can often be fixed by ensuring all equipment is properly grounded and using high-quality cables. Additionally, keeping power sources for audio equipment separate from those of other electrical devices can help reduce interference.
Phase issues can be addressed by carefully positioning microphones and checking their polarity. If using multiple microphones, try flipping the phase switch on one of the channels to see if it improves the sound, or experiment with mic placement to minimize cancellation effects.
Insufficient monitoring can be improved by investing in quality studio monitors or headphones and ensuring a proper acoustically treated environment. Regularly check and adjust levels in your monitoring system to ensure you are hearing an accurate representation of your mix.
Related Post: