Imagine standing in pouring rain with your favorite gear in hand, trying to figure out the perfect levels for recording and mixing. I’ve been there, and I learned that clear, versatile control makes all the difference. After testing countless setups, I found that a good sound card and mic combo really helps tame those tricky levels and ensures your audio stays crisp and balanced. Finding the right balance can turn a good recording into a professional-sounding project.
From my experience, the Podcast Microphone & Sound Card Bundle for Streaming stands out. It offers multiple inputs, easy-to-use controls, and features like noise reduction and voice effects, making it perfect for both beginners and pros. Its durable build and comprehensive connectivity help you fine-tune your audio easily,whether you’re streaming, recording, or podcasting. Trust me, this bundle simplifies leveling and mixing, giving your voice the clarity it deserves. It’s a no-brainer for anyone serious about great sound.
Top Recommendation: Podcast Microphone & Sound Card Bundle for Streaming
Why We Recommend It: This bundle combines the P15 Microphone with a versatile G10 sound card that supports dual 3.5mm mic inputs, XLR, and more. It excels in controlling audio levels with 12 electronic tone adjustments, built-in noise reduction, and real-time effects, providing precise control during recording and mixing. Unlike the simpler bundle, it offers multiple inputs and dynamic features, making it ideal for balancing different sources. Its robust connectivity options and sound shaping capabilities make it the most comprehensive choice for achieving perfect levels.
Best levels for recording and mixing audio: Our Top 2 Picks
- Podcast Microphone & Sound Card Bundle with BM800 Microphone – Best Value
- Podcast Microphone & Sound Card Bundle for Streaming – Best Premium Option
Podcast Microphone & Sound Card Bundle with BM800 Microphone

- ✓ Easy to use controls
- ✓ Impressive sound quality
- ✓ Versatile voice modes
- ✕ Slight learning curve
- ✕ Bulkier setup
| Microphone Compatibility | Supports XLR microphone with phantom power |
| Preamp Quality | High-quality built-in preamps with support for phantom power |
| Input Options | Simultaneous inputs for 6.35mm dynamic mic, 3.5mm mic, and headset mic |
| Sound Processing Features | Dual DSP processors with DENOISE function and 5 reverb modes |
| Display | 4.5-inch high-definition dot-matrix LCD with 6 adjustable angles |
| Voice Mode Storage | 19 customizable saved voice modes for quick switching during live streams |
Opening the box revealed this sleek, professional-looking setup with a surprisingly substantial build. The BM800 microphone feels solid in your hand, with a nice weight that hints at quality.
As you plug everything in, the first thing that catches your eye is the colorful, high-definition LCD display—bright and easy to read even from a distance.
Setting up the G10 sound card was straightforward, thanks to the clear controls and labeled ports. The adjustable angle screen is a nice touch—it tilts smoothly and stays put, giving you a clear view of your levels during recording or live streaming.
The sound quality immediately impresses, with the built-in pre-amps delivering clean, crisp audio.
As you start experimenting with the voice modes and effects, you realize how versatile this bundle truly is. The six reverb presets and pitch controls make it easy to add depth or effects on the fly—perfect for podcasts, DJ sets, or live streams.
The ability to save 19 different voice modes means you can switch styles instantly, which is a huge time-saver during busy sessions.
The dual DSP processors and DENOISE features work wonders, reducing background noise and ensuring your voice remains clear. Connecting multiple mics and headsets is simple, making this ideal for multi-person recordings or interviews.
Overall, it’s a robust, feature-rich package that makes professional-level audio accessible without complicated setups.
Podcast Microphone & Sound Card Bundle for Streaming
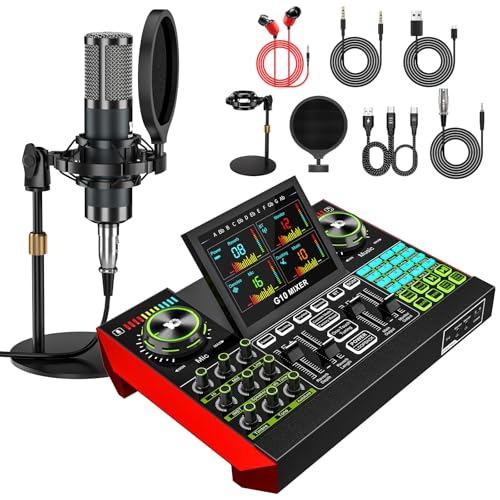
- ✓ All-in-one professional setup
- ✓ Versatile connectivity options
- ✓ Easy to operate
- ✕ Mic needs charging first
- ✕ Slight learning curve with sound effects
| Microphone Type | Condenser microphone with cardioid polar pattern |
| Microphone Frequency Response | Not explicitly specified, but suitable for voice recording and streaming |
| Microphone Sensitivity | Not specified, but designed for professional podcasting and voice clarity |
| Sound Card Inputs | Dual 3.5mm microphone inputs, XLR input, 6.5mm dynamic microphone input, instrument input |
| Sound Card Outputs | Headphone monitoring output |
| Connectivity | USB connection to PC, OTG compatible with smartphones, supports multiple device connections |
From the moment I unboxed this podcast microphone and sound card bundle, I was struck by how all-in-one it feels. The P15 microphone has a sturdy build with a sleek, metallic finish that immediately screams professional.
Setting it up was surprisingly straightforward, with the included stand and windscreen fitting perfectly and reducing background noise right out of the box.
The G10 sound card is compact but packed with features. Connecting my headphones, microphone, and even my guitar was seamless thanks to its versatile inputs.
I especially appreciated the dual 3.5mm mic inputs and the ability to connect via USB or OTG cable—whether I’m streaming from my PC or mobile, everything feels flexible.
The real game-changer is the sound quality. The cardioid mic isolates my voice cleanly, and the windscreen helps cut down plosives during long recordings.
When I turned on the sound effects and voice changer, it instantly added a fun, professional vibe to my live streams without needing extra software or equipment.
The G10 mixer’s built-in noise reduction and tone controls are intuitive. Adjusting treble, bass, and midrange is quick, and the 16 sound effects bring a lively atmosphere to my streams.
Plus, the pitch control and voice changer let me experiment and find my perfect sound. It’s clear that this setup is designed for ease of use, even if you’re just starting out.
Overall, this bundle simplifies what used to be a complicated process, giving you everything you need in one package. It’s ideal for anyone serious about professional-sounding recordings and engaging live streams.
The only minor hiccup was charging the condenser mic before use, but that’s a small step for such quality results.
What Are the Ideal Levels for Audio Recording?
Achieving the ideal levels for audio recording is crucial for ensuring clarity and avoiding distortion. Here are some key points to consider for optimal recording levels:
-
Peak Level: Aim for a peak level between -12 dBFS and -6 dBFS. This range prevents clipping while ensuring a strong enough signal for post-production.
-
Average Level: The average level, or RMS (Root Mean Square), should hover around -18 dBFS to -12 dBFS for most recordings. This ensures a balanced mix without erratic volume spikes.
-
Monitor Levels: Use a VU meter to monitor levels in real-time while recording. This helps visualize dynamic range and adjust inputs accordingly.
-
Headroom: Always leave adequate headroom (at least 6 dB) to accommodate any unexpected peaks that may occur during recording.
-
Different Sources: Adjust levels based on the source. Vocals may require different settings compared to instruments like drums or guitars, which can have larger dynamic ranges.
Following these guidelines will help achieve clean, professional recordings that stand up well during the mixing process.
What Is the Recommended Level for Mixing Audio?
Benefits of maintaining the best levels for recording and mixing audio include improved dynamic range, better clarity, and enhanced listener engagement. By ensuring that audio is mixed at appropriate levels, engineers can create a more polished and professional sound that resonates with audiences. Additionally, proper level management can streamline the mixing process, reducing the need for extensive adjustments during mastering.
Best practices for achieving optimal levels involve regularly calibrating monitoring systems, using metering tools effectively, and developing a consistent workflow that prioritizes headroom. It is also advisable to conduct mix evaluations on different playback systems to ensure that the levels translate well across various formats. Engaging in these practices not only enhances the quality of the final product but also fosters greater creativity and efficiency in the mixing process.
How Important Is Headroom for Recording Levels?
Headroom is crucial for achieving optimal recording levels and preventing distortion in audio production.
- Prevention of Distortion: Maintaining adequate headroom ensures that audio signals do not clip, which occurs when the signal exceeds the maximum level that can be accurately captured. This clipping results in a harsh, distorted sound that is often undesirable in mixing and mastering.
- Dynamic Range Preservation: Proper headroom allows for the full dynamic range of audio to be captured, meaning both quiet and loud sounds can be recorded without loss of quality. This is especially important in genres where dynamics play a critical role in the emotional impact of the music.
- Easier Mixing Process: When recording levels are set with sufficient headroom, mixing becomes much simpler as it provides more flexibility to adjust levels without risking distortion. This allows for finer control over how individual elements of a track interact with each other in the mix.
- Compatibility with Post-Production: Adequate headroom is essential for ensuring that recordings can be processed effectively during mixing and mastering stages. It helps avoid unintended artifacts that can arise when processing signals that are too close to clipping, leading to a more polished final product.
- Consistency Across Tracks: Setting a standard for headroom across all recordings helps maintain consistent audio levels throughout an album or project. This consistency is key for achieving a cohesive sound, making it easier for listeners to engage with the music without abrupt changes in volume.
What Are the Common Mistakes in Setting Audio Levels?
Common mistakes in setting audio levels include:
- Ignoring Headroom: Failing to leave sufficient headroom can lead to distortion when peaks occur during recording or mixing.
- Inconsistent Level Monitoring: Not consistently monitoring audio levels can result in varying volume levels throughout a track, making it difficult to achieve a balanced mix.
- Overemphasizing Loudness: Focusing too much on making tracks loud can compromise dynamic range and clarity, ultimately degrading audio quality.
- Neglecting Metering Tools: Not utilizing metering tools effectively can prevent accurate assessment of levels, leading to missed opportunities for proper adjustments.
- Setting All Tracks at the Same Level: Treating all tracks equally without considering their individual characteristics can result in a flat mix that lacks depth and texture.
Failing to leave sufficient headroom can lead to distortion when peaks occur during recording or mixing. It’s important to maintain a level that allows for unexpected volume spikes while ensuring a clean sound without clipping.
Not consistently monitoring audio levels can result in varying volume levels throughout a track, making it difficult to achieve a balanced mix. Regular checks during both recording and mixing phases help maintain consistency and ensure a professional sound.
Focusing too much on making tracks loud can compromise dynamic range and clarity, ultimately degrading audio quality. Instead, it’s essential to prioritize a well-balanced mix where each element has its place and can be heard clearly without unnecessary loudness.
Not utilizing metering tools effectively can prevent accurate assessment of levels, leading to missed opportunities for proper adjustments. Metering tools provide essential visual feedback that helps ensure levels are set correctly and remain within desired ranges.
Treating all tracks equally without considering their individual characteristics can result in a flat mix that lacks depth and texture. Each instrument or vocal should be adjusted according to its role in the mix to create a more engaging and dynamic listening experience.
How Can You Maintain Proper Levels Throughout Mixing?
To maintain proper levels throughout mixing, it is essential to consider a few key practices:
- Set a Reference Level: Establish a consistent reference level to help gauge the loudness of your audio tracks during mixing. This usually involves setting your peak level around -6 dB to -3 dB on the meters to allow headroom for any further processing.
- Use Metering Tools: Utilize metering tools such as VU meters, peak meters, and loudness meters to monitor your levels accurately. These tools help you visualize the dynamics of your audio, ensuring that no single track is overwhelming others and that overall mix balance is achieved.
- Avoid Clipping: Keep an eye on peak levels to prevent clipping, which can introduce unwanted distortion. Clipping occurs when audio levels exceed 0 dBFS, so maintaining levels below this threshold protects your mix’s integrity.
- Gain Staging: Implement proper gain staging at each step of your audio signal chain. This means adjusting the level at each stage (input, processing, output) to ensure that no stage is too loud or too quiet, which keeps the audio clean and clear.
- Use Headroom Wisely: Leave sufficient headroom in your mix to accommodate dynamic changes and effects processing. Aim for at least 3 dB of headroom to ensure that your mix can handle any peaks without distortion.
- Regularly Check Levels: Constantly re-evaluate your levels as you add new tracks or effects. Mixes can evolve, and what sounded balanced initially might shift as more elements are introduced.
- Bus Mixing: Use buses to group similar tracks and control their levels collectively. This technique helps maintain a cohesive sound and makes it easier to adjust levels for multiple tracks simultaneously.
- Listen at Various Volumes: Assess your mix at different playback volumes to ensure it sounds balanced at all levels. This practice helps reveal any issues with level adjustments that might only be apparent at specific listening levels.
What Tools and Techniques Help Monitor Audio Levels Effectively?
To effectively monitor audio levels during recording and mixing, several tools and techniques are essential.
- Digital Audio Workstation (DAW): A DAW is software used for recording, editing, and mixing audio. It typically features visual meters that display audio levels in real-time, allowing users to adjust gain and levels dynamically to achieve the best results.
- Audio Interfaces: These devices convert analog signals to digital for your computer and vice versa. High-quality audio interfaces often come with built-in metering that helps monitor levels before they reach the DAW, ensuring optimal recording quality.
- Peak and RMS Meters: Peak meters indicate the maximum level of audio signals, while RMS (Root Mean Square) meters provide an average level over time. Using both allows for a comprehensive understanding of audio dynamics, helping to prevent distortion and maintain clarity in recordings.
- LUFS Metering: Loudness Units Full Scale (LUFS) meters measure perceived loudness, which is crucial for mixing audio that competes well in various playback systems. This technique helps ensure that your mix has a consistent loudness level, which is vital for streaming platforms and broadcast standards.
- Headphones and Studio Monitors: Good quality headphones and studio monitors are essential for accurately hearing audio levels. They provide a flat frequency response, allowing for an honest representation of the audio, which is crucial for making precise mixing decisions.
- Reference Tracks: Using professionally mixed tracks as a reference helps in setting and monitoring levels. By comparing your mix to these tracks, you can ensure that your audio levels are competitive and balanced across different playback environments.
- Metering Plugins: These are software tools that provide advanced visual feedback on audio levels. They can show detailed information such as stereo imaging, frequency analysis, and dynamic range, helping to make more informed mixing decisions.
- Gain Staging: This technique involves managing the levels at various stages of the recording and mixing process to avoid distortion and maintain headroom. Proper gain staging ensures that each element of the mix is at the right level, leading to a cleaner and more professional sound.